|
This lesson assumes you already know what triad chords are, and what the numbered chord progression system is.
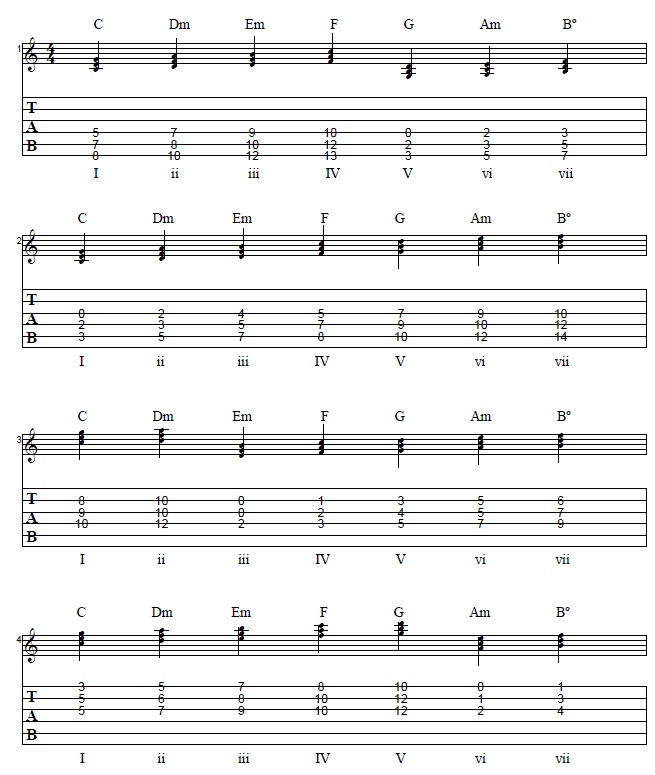
As of the writing of this lesson I do not have a triad explanation lesson, but I do have one one the numbered chord progression system. CLICK HERE for the numbered progression lesson. Eventually there will be an entire course on chord theory. This lesson will go over how you can approach practicing and learning your triad chord shapes. This will be kept in the key of C. All of my in person students learn their triads in the way this lesson is presented. First, get comfortable playing the following chord shapes in the order they are presented:
Once you've familiarized yourself with playing those chords in order, it's time to use some chord progressions using the numbered chord progression system.
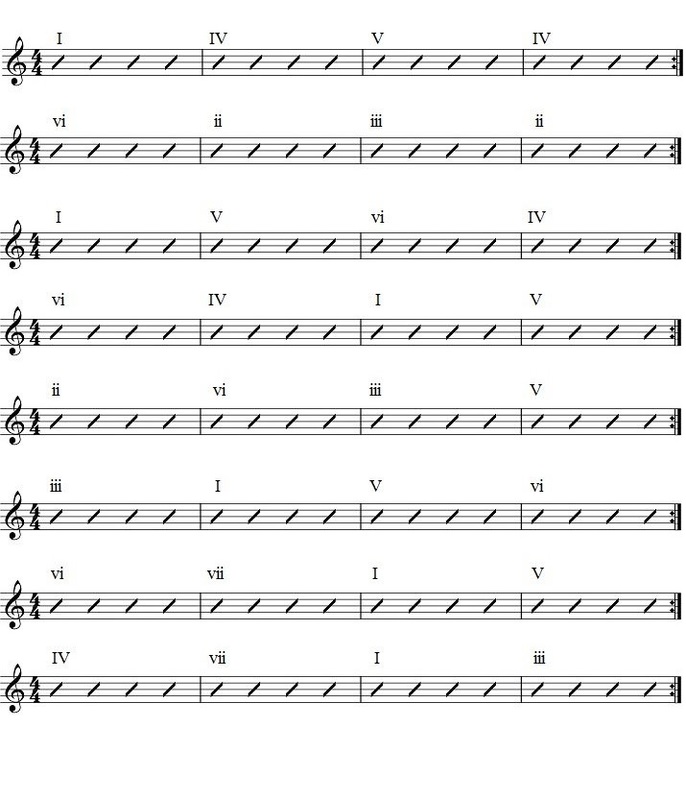
These are the 8 chord progressions to use:
What you will do with each progression is important. You will start with the first group of chords you played earlier. The first group of chords are all the chords that start on the low E string.
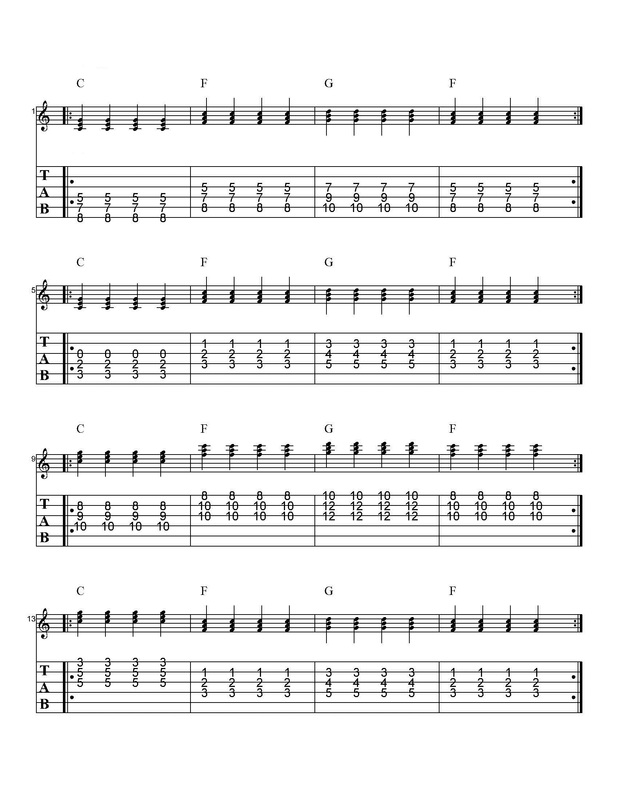
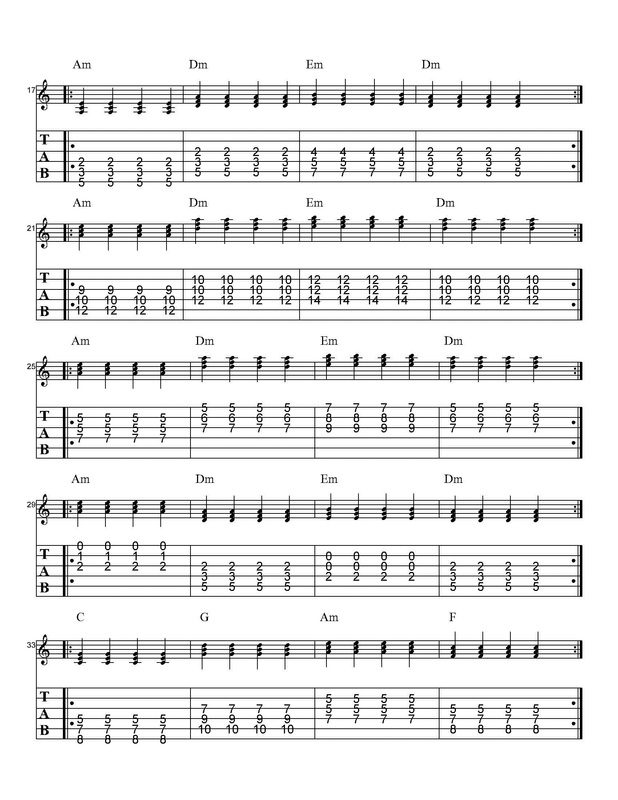
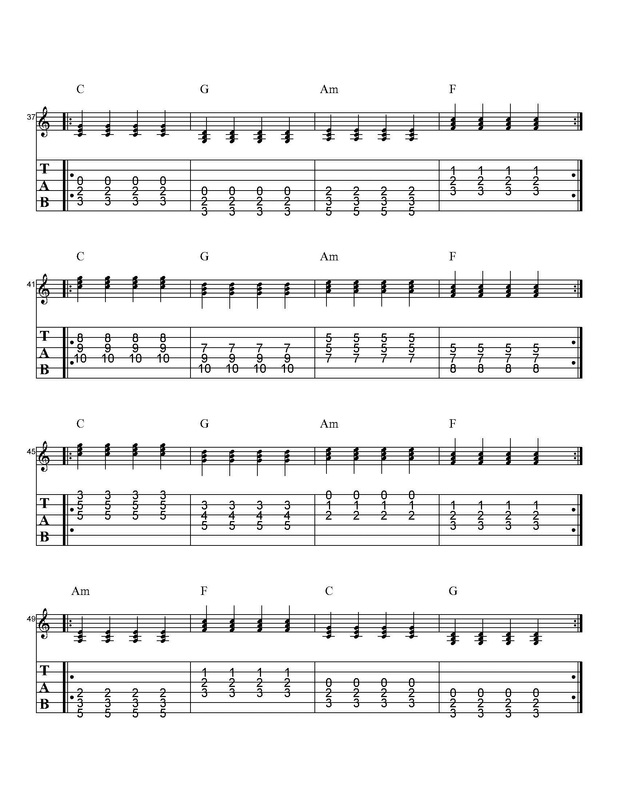
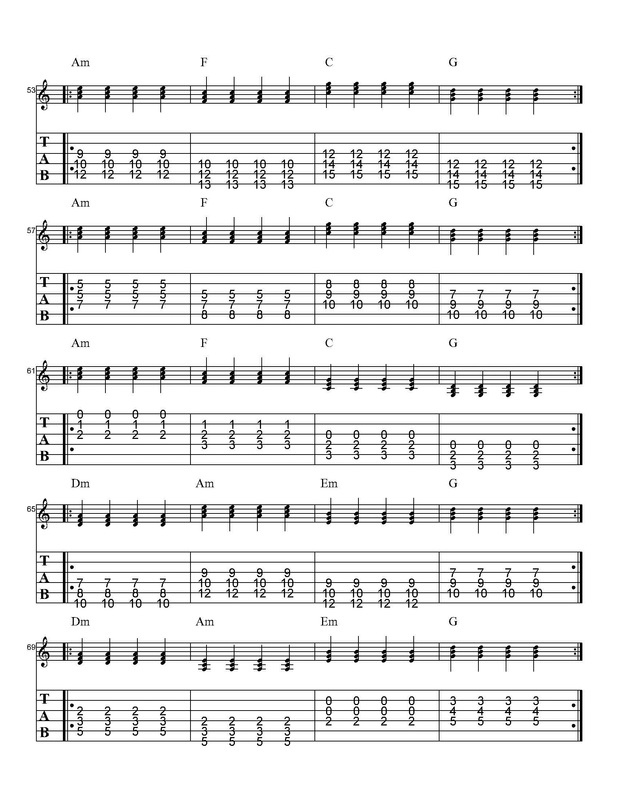
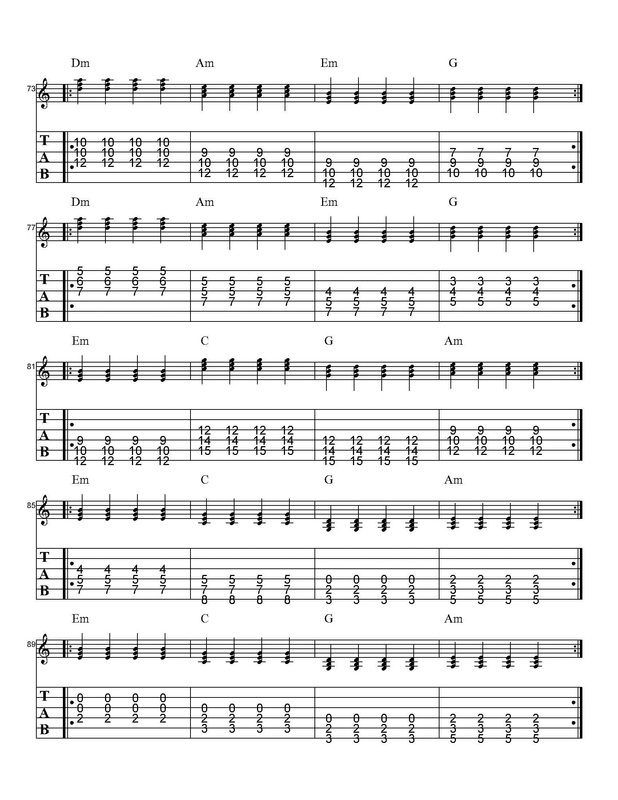
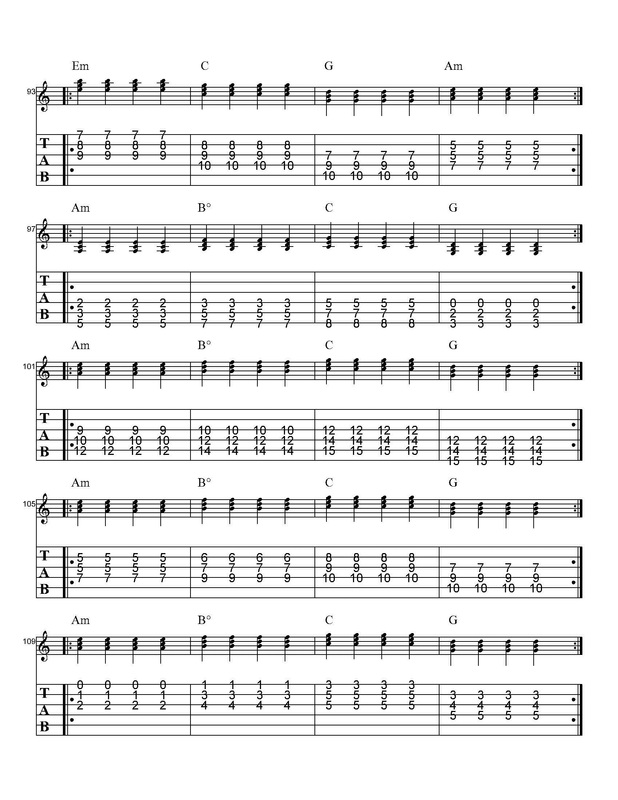
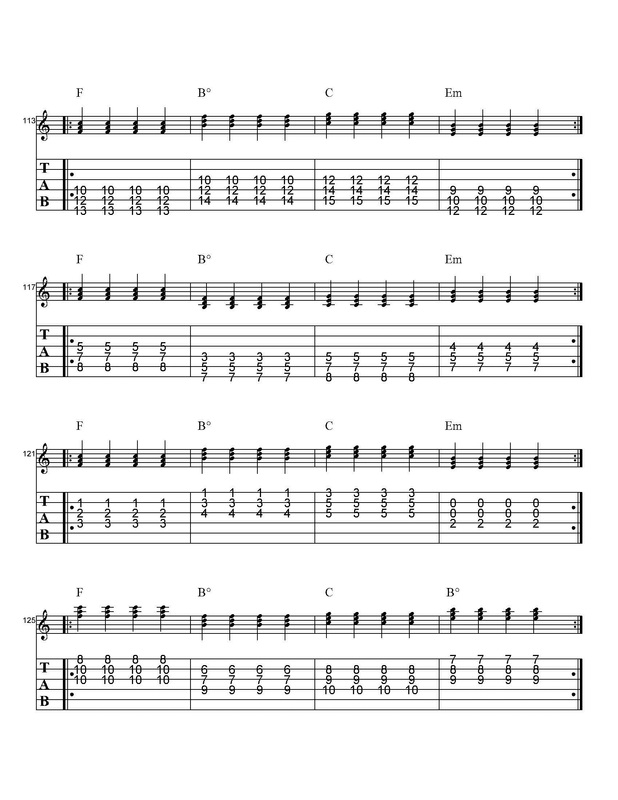
Play the first chord progression to begin. Play the I - IV - V - IV plus repeat. You can use the tab from above and match the Roman numerals that are underneath each chord to the chord progression(s). So, you'll be playing C, F, G, F, repeat. Play each chord 4 times. That's what each slash represents in the above image with the chord progressions. Each slash represents one chord strum. The video at the end of this lesson demonstrates this idea. After you can play the first progression with no mistakes, move on to the second progression with the same group of chords. Keep doing this until you play all 8 progressions. Then, move on to the second group of chords; the chords that start on the A string. After you can play all 8 progressions with the second group of chords, move on to the third group of chords. After completing all 8 progressions with the third group of chords, move on to the fourth group. Once all that is done, it's time to play the chords in a more practical manner. Instead of making large jumps from left to right, it's now time to play the chords in close proximity. The following tabs show all 8 chord progressions played in 4 different ways so you can get very familiar with how these triad chords are laid out on the fretboard in the key of C.
If you want more chord progressions I recommend going to Random.org and putting together random generated progressions. Use the numbers 1 and 7 for the variables. You're welcome to put together progression that use less or more than 4 different chords. Have fun with it!
This lesson does not cover voicings and inversions. Voicings and inversions open up far more possibilities on playing triad chords. If you'd like a lesson on them, tell me! Check out the following video for demonstrations of this lesson:
2 Comments
I was asked to do a video on how to master chord progression speed.
First, I want to address this idea of mastering anything on your instrument. You will never master anything. I'm serious. You will never master anything, because it is simply not possible. To master something means you took that thing to its utmost peak of perfection. There is now no possible way to improve. We can always make improvements on anything we work on. None of us are ever truly masters. So please, I invite you to have this perspective when you learn your instrument and be reasonable with yourself. Several times I've seen advertisements saying you can master this and that on guitar with some number of tricks and what not. It's all bullshit. It's just a sales gimmick. Personally, I would steer clear of places that offer this. Why? I do not believe they truly have your best interest at heart. They just want your money. So, how about we rephrase the initial question. How can you speed up chord progressions? The answer is - Metronome! Yes, the good ol' metronome. Take whatever progression you are trying to speed up and play it slowly to the metronome and gradually increase the speed of the metronome after each successful play through of the progression. Let's say you are working on going between an Am and C chord. You strum each chord four times then switch. Start your metronome at 60 bpm. Aim to hit the chord once every time your metronome clicks. After you can successfully play the progression at least twice through with no mistakes at 60 bpm, bump it up to 65 bpm. Keep bumping up by 5 bpm each time the progression is done correctly and you will see amazing results. Now, let's say you are having trouble just switching between two different chords, like going from a G chord to an F chord. Set your metronome up to 60 bpm again. This time, instead of playing each chord four times, you will only play it once. Play your G chord on beat one, then, use the time it takes for beats 2, 3, and 4 to go by to get set up for the F chord. Then play the F chord when beat 1 starts again, and then start getting ready for the G chord. It will look/sound something like this: G chord (move to the F chord) F chord (move to the G chord) Click Click Click Click Click Click Click Click Beat 1 Beat 2 Beat 3 Beat 4 Beat 1 Beat 2 Beat 3 Beat 4 Those clicks represent the sound your metronome makes. The beats underneath show you how to keep count of each beat. The chords above are shown over the beat you play them. The (move to ____ chord) is telling you to start moving to the next chord to be ready to play it when it comes time to strum the next chord. Basically, you are hitting a chord and not letting it ring out until the next chord needs to be played. Play the first chord, and then start moving those fingers right away so they are in position and ready to play the next chord. Giving yourself those extra beats in between chords can help give you enough time to switch chords. So, let's say you have gone between the G and F two times with the method just mentioned. Now, you guessed it, move up the metronome 5 bpm. The more times you speed up the metronome the smaller the gap between the chords will become. This will gradually train your hand to jump into new chord shapes. This will all make a lot more sense by watching the following video:
|
Available Instruction Courses
|
- Metal and Rock Guitar Lessons
- Reach Your Fastest Speeds
-
Menu
- Skype Lessons
- Sign Up for Skype Guitar Lessons
- Video Correspondence Lessons
- Sign Up for Video Correspondence Lessons
- FREE Lessons for a WEEK >
- Free Tabs
- Get TWO FREE eBooks
- Rates
- Instruction Courses >
- Video Feedback Lessons
- Contact
- Blog (LOTS of Free Lessons)
- Student Testimonies
- Backing Tracks
- Store
IN DEPTH
|
|


 RSS Feed