|
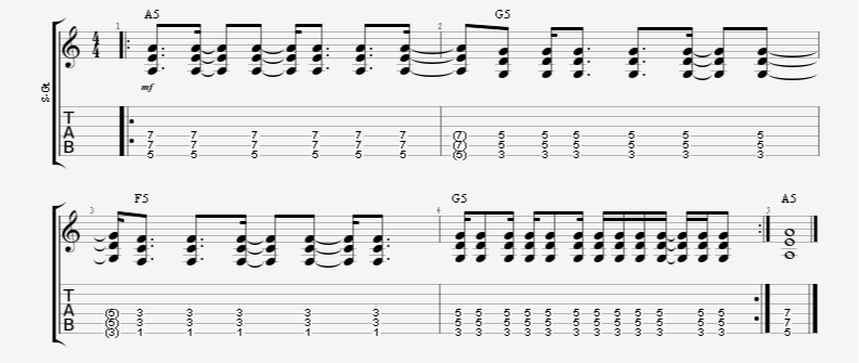
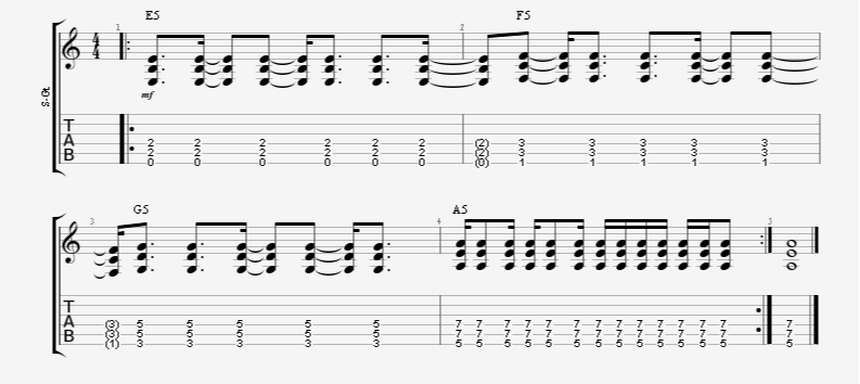
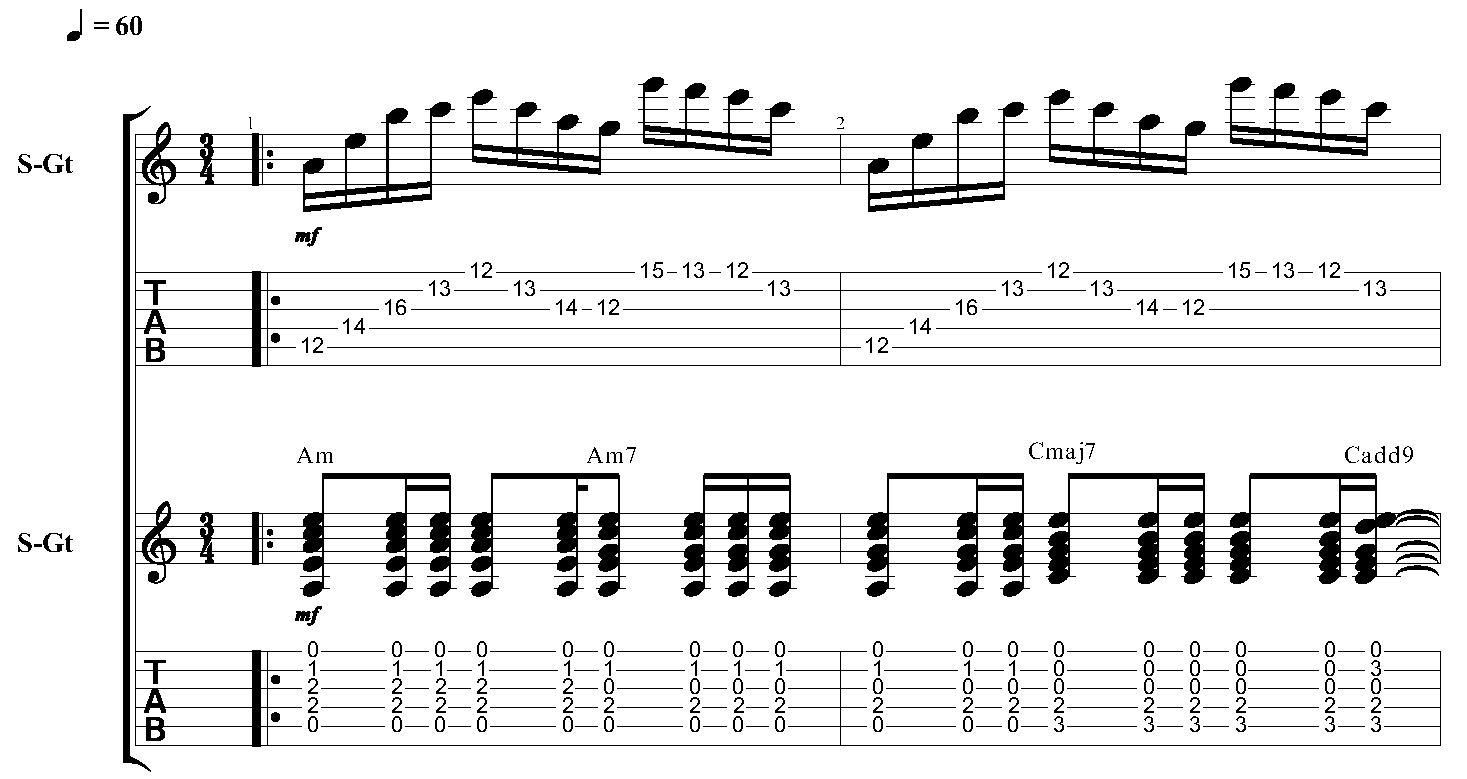
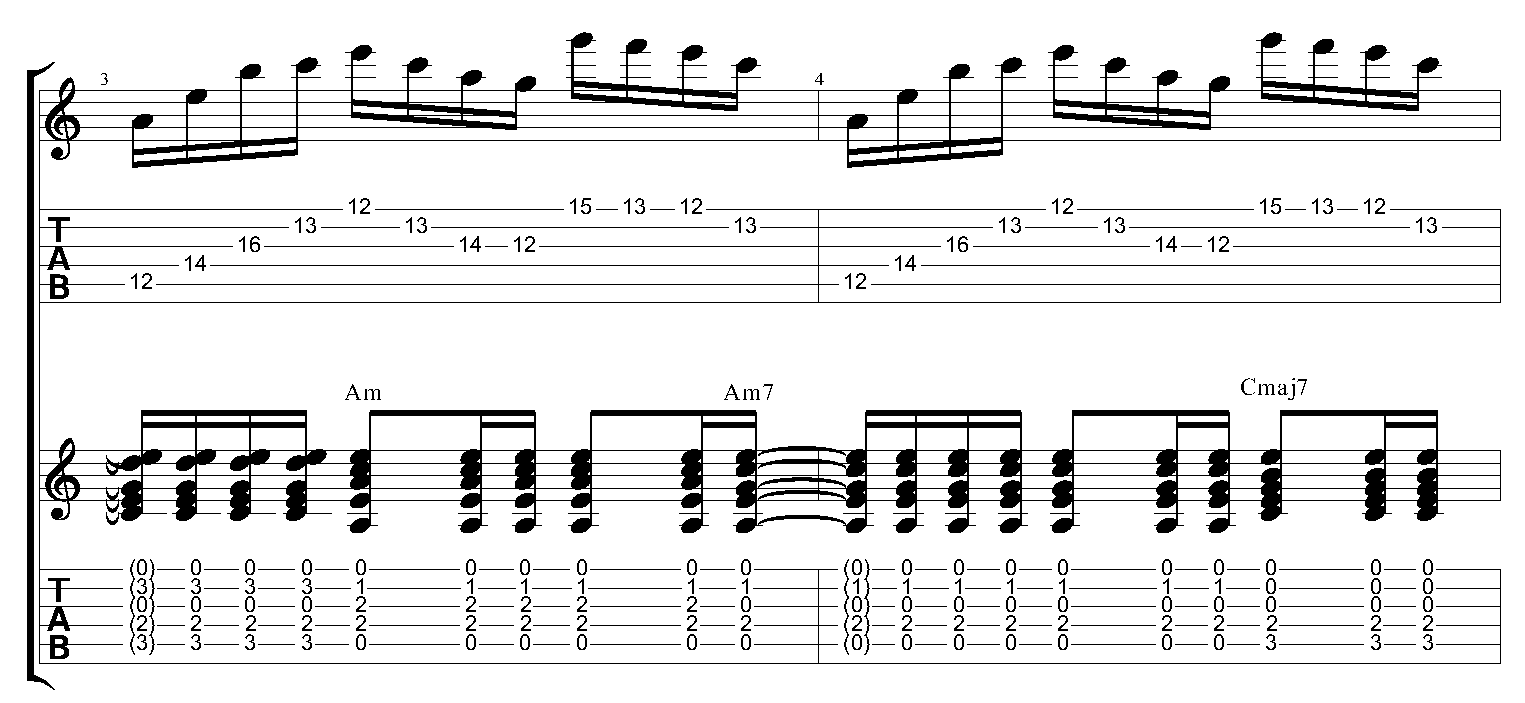
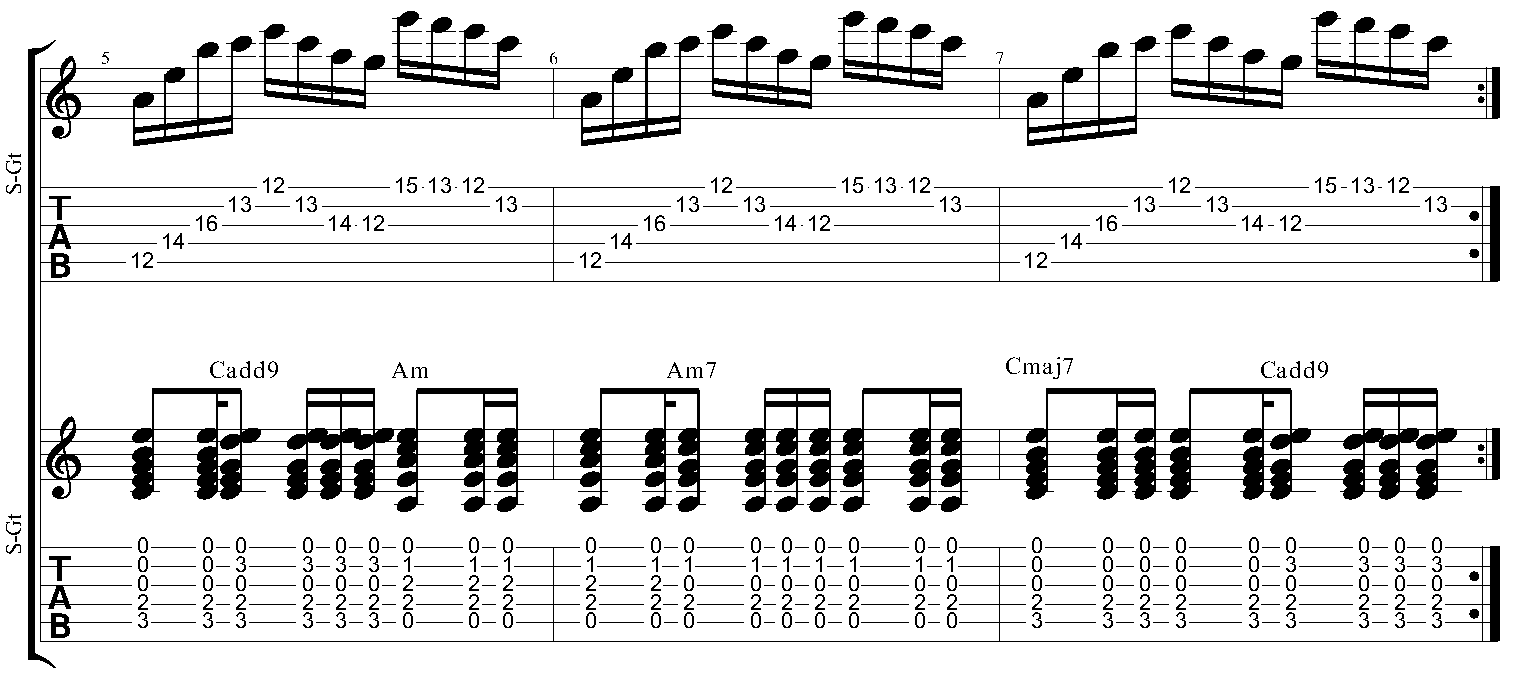
This guitar rhythm strumming pattern evenly spaces 4 chords across 3 beats, and repeats this for 3 full bars. The 4th bar breaks away from that pattern.
The count for this is 1--a--n--e--4--a|--n--e--3--a--n-| -e--2--a--n--e--|1e-2e-a3ena-en-
Here is the Guitar Pro 6 tab for this lesson:
0 Comments
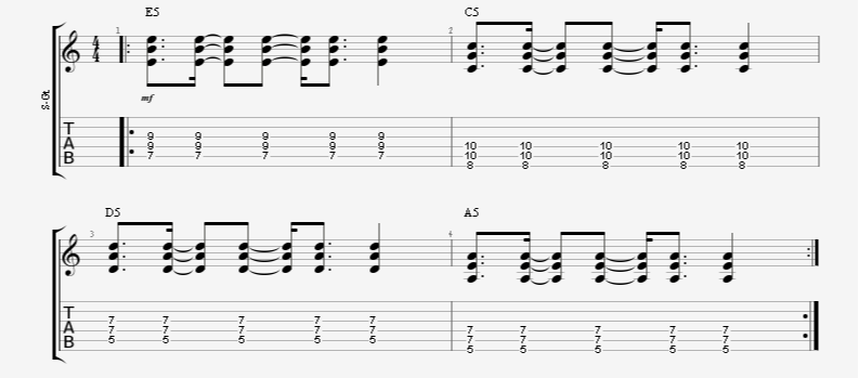
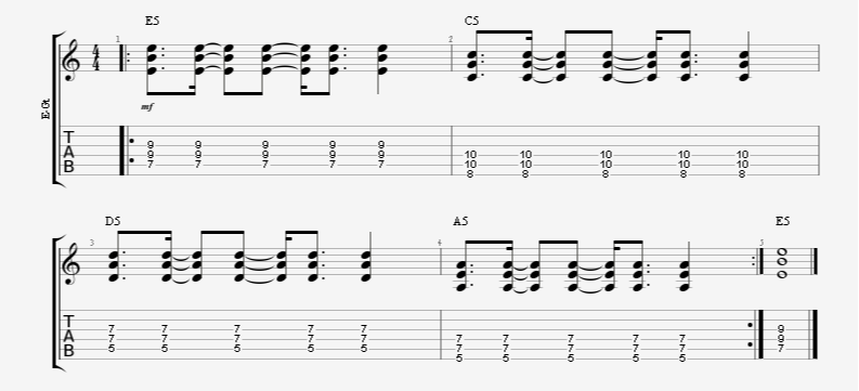
The first three beats in each bar is basically a 4:3 polyrhythm. You have 4 chords evenly spaced across 3 beats. The quarter note played on beat 4 is a bit of a break from playing the polyrhythm.
The count for this is 1__a__n__e__4___
Here is the Guitar Pro 6 tab for this lesson:
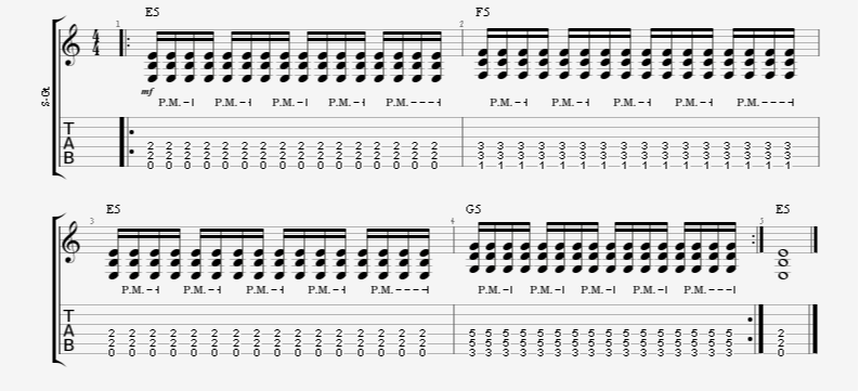
This palm-mute accent pattern creates a polyrhythmic sound. Because you don't palm-mute the first 16th note of every grouping of three 16th notes, four times you create an emphasis with the chords that are evenly spaced across three beats. Beat four is when the polyrhythm is no longer happening.
Here is the Guitar Pro 6 tab for this lesson:
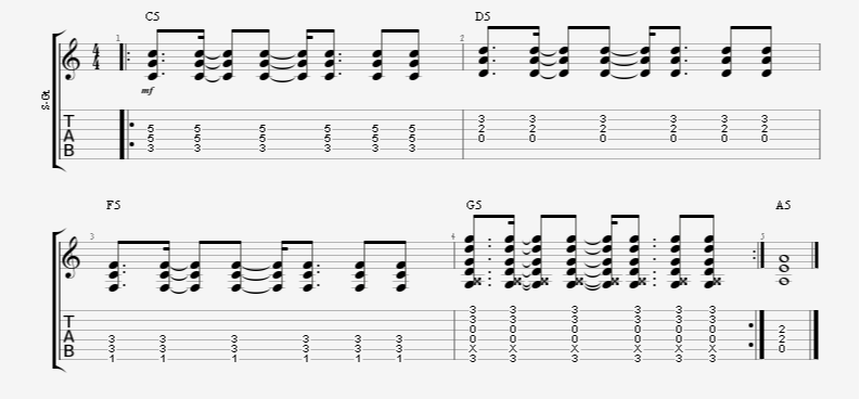
This was given to a guitar student to introduce a 4:3 polyrhythm strumming pattern. It's a 4:3 polyrhythm because you have 4 chords evenly spaced across 3 beats. The two 8th notes in beat 4 are there to fill out the rest of the bar.
Here is the Guitar Pro 6 tab for this lesson:
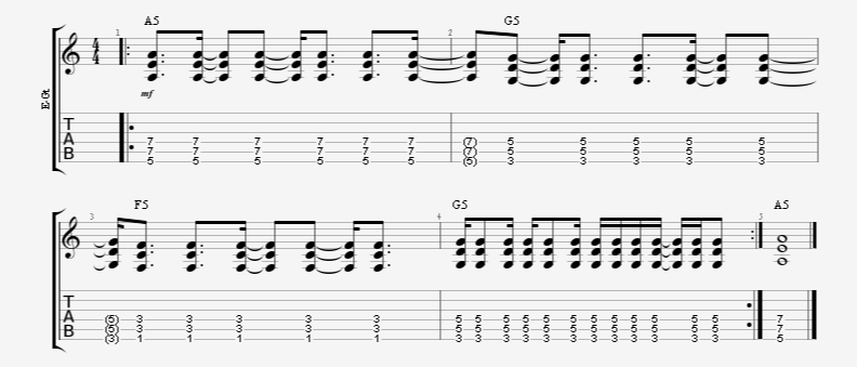
The rhythm structure here is essentially a 4:3 polyrhythm. 4 chords are evenly spaced across 3 beats. This continues to repeat throughout 3 bars. The 4th bar breaks up the pattern to have something different.
Here is the Guitar Pro 6 tab for this lesson:
This is basically a 4:3 polyrhythm. You have four chords being evenly spaced across three beats. After every third beat the polyrhythm starts over again. The fourth bar is just something to break away from the polyrhythm pattern being repeated over and over.
Most people struggle a LOT when they learn how to play this, so take your time and break this thing down into as many small pieces as needed so you can better understand what is happening. Good luck!
Here is the Guitar Pro 6 tab for this lesson:
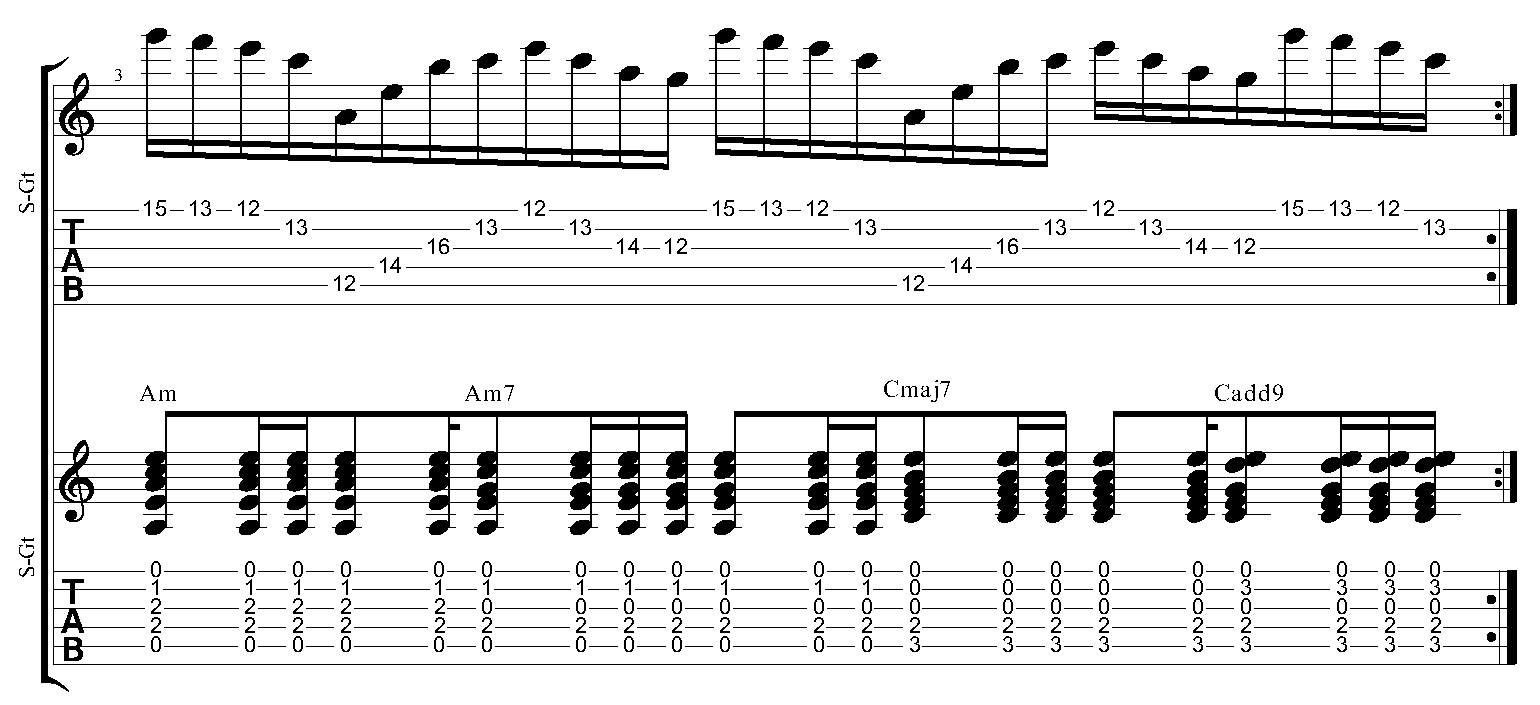
This is something I like to give students after they've advanced through SEVERAL different 16th note based strumming patterns. It's basically a polyrhythm that starts each bar/measure. You have 4 chords evenly spaced across the first 3 beats. Beat 4 is just a quarter note to give the brain a break from playing the polyrhythm.
Here is the Guitar Pro 6 tab for this lesson:
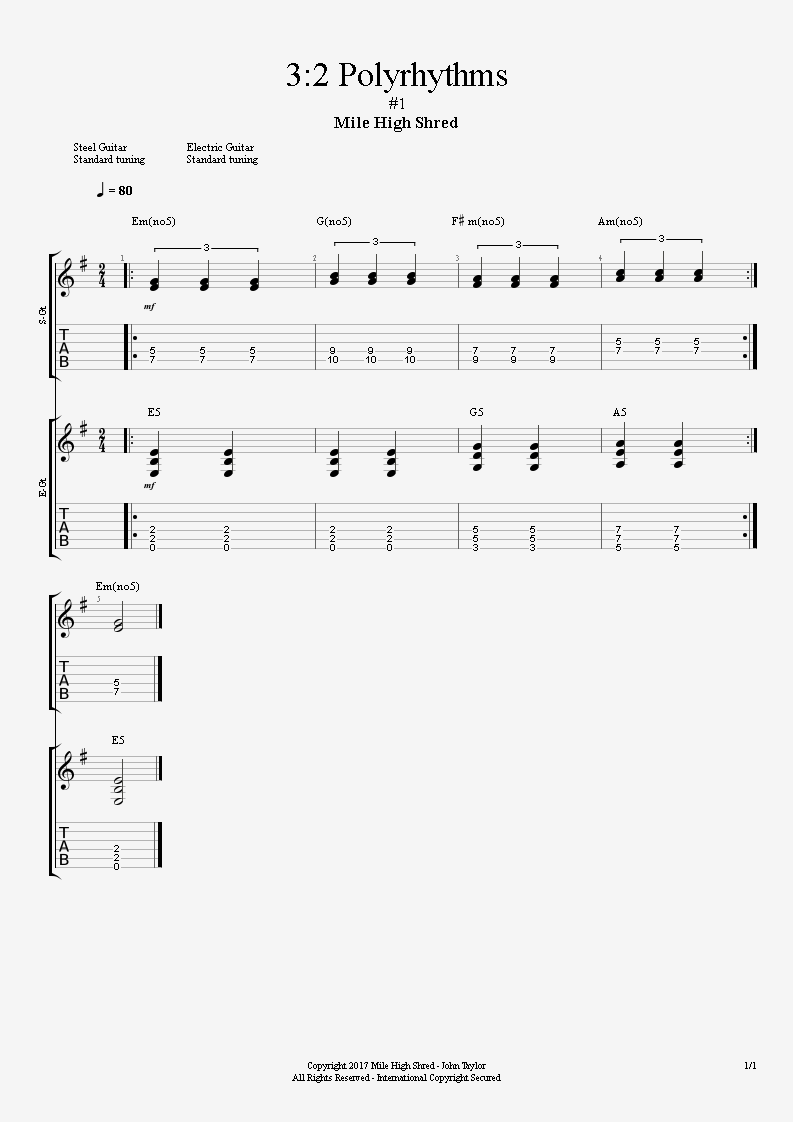
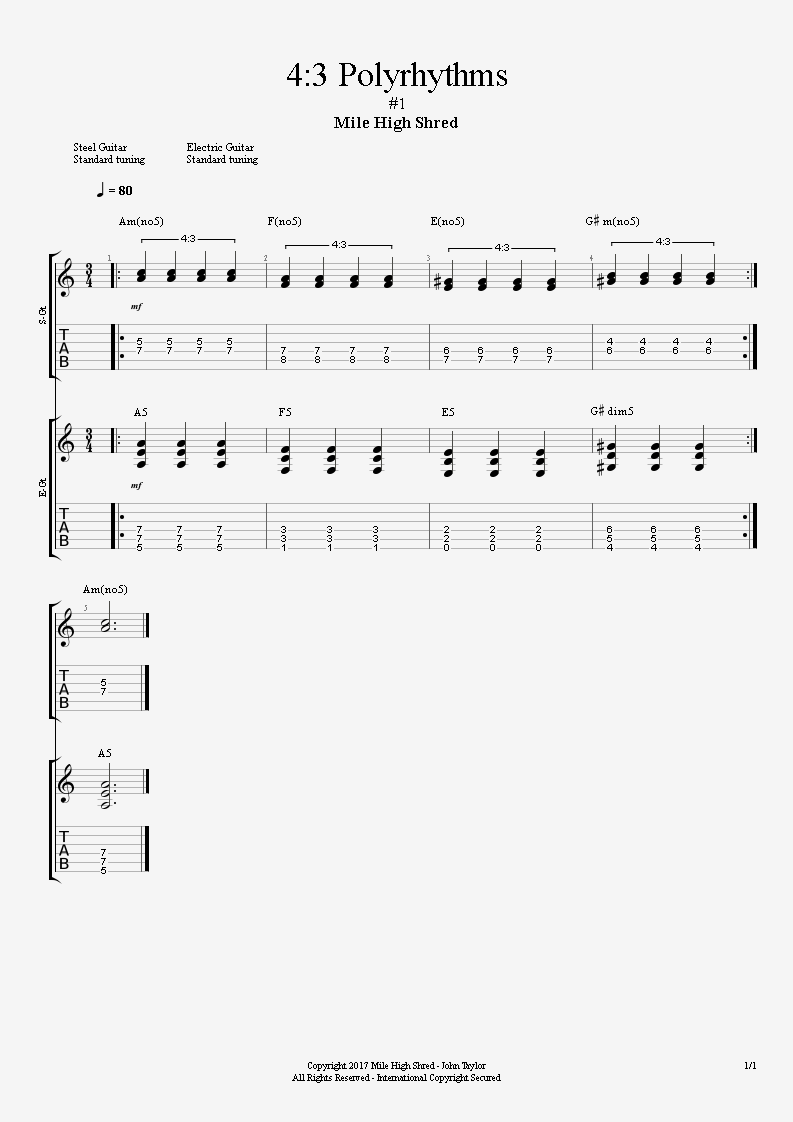
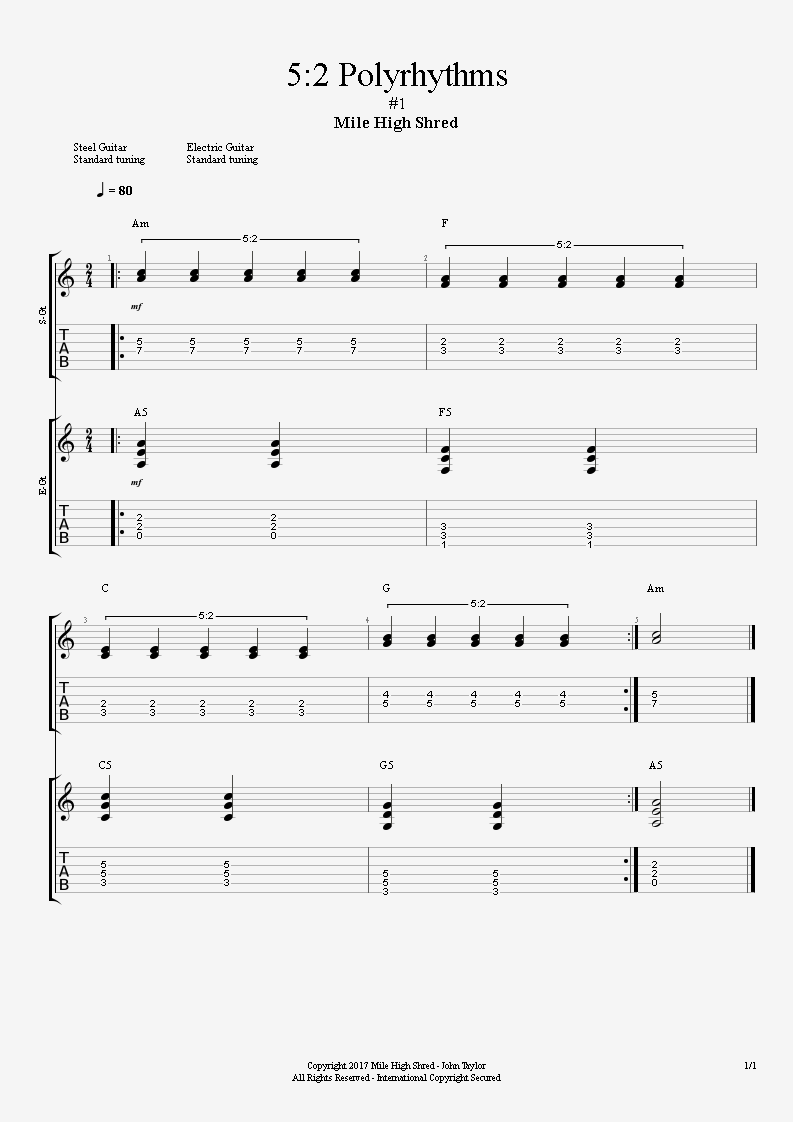
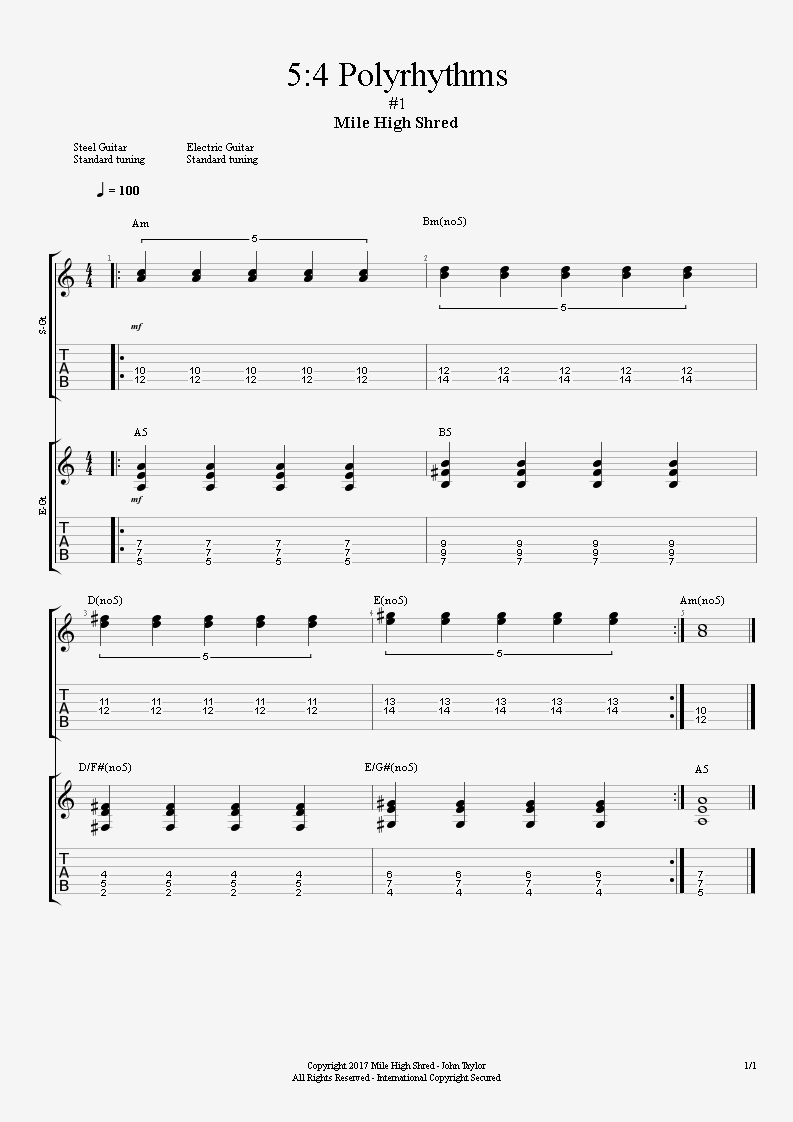
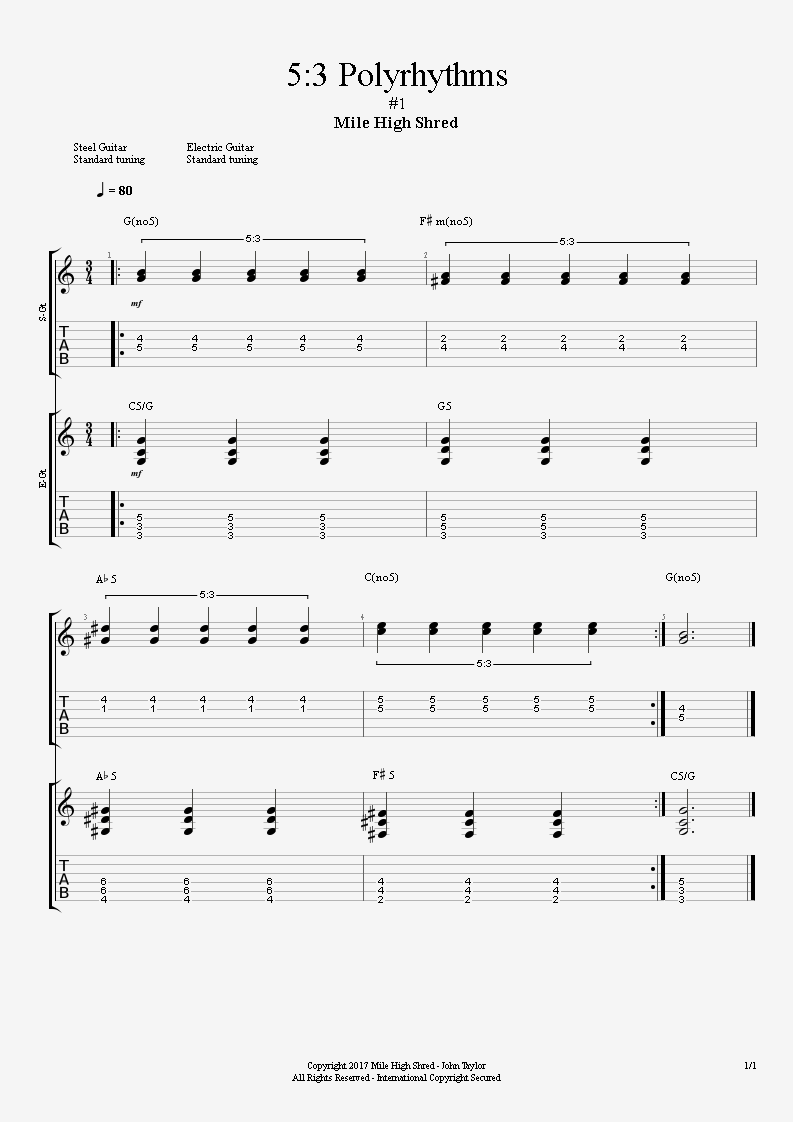
These 5 polyrhythm examples are written for two different guitars. If you need help understanding polyrhythms in greater detail, please take a look at these previous polyrhythm/polymeter lessons: The polyrhythms demonstrated in this lesson are:
You will see the tablature for the polyrhythm example followed by a video demonstration. This will be for all five examples. The following is the full video lesson. You gotta watch it at least for the intro! If you have any questions about this material please leave them in the comments section. DO IT!!! For even MORE info on polyrhythms for guitar, check out the lesson posted by Musical U https://www.musical-u.com/learn/making-sense-of-polyrhythms/
This is the 3rd lesson in the Polyrhythm series.
Lesson One: An Introduction to Polyrhythms Lesson Two: How to Play Polymeters
In this lesson we will look at a simple way of spacing out polyrhythms and how to count them.
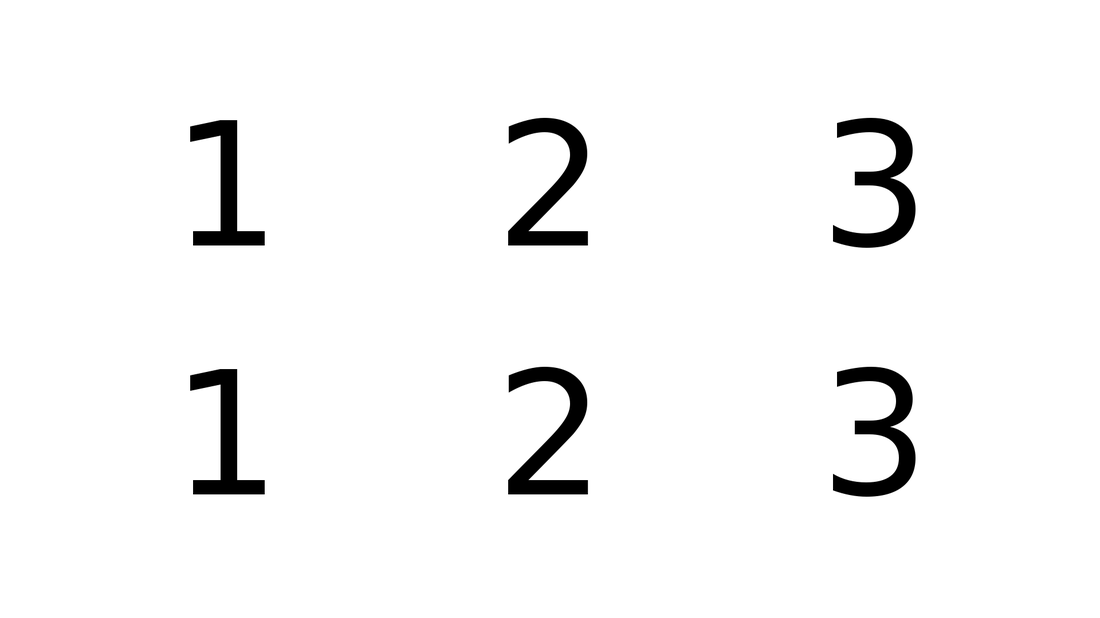
There are multiple ways to figure out how to play, understand, and count a polyrhythm, but my goal is to show you how to do this in a simple and effective manner. Let's begin with a 3:2 polyrhythm. How do you evenly space the notes, or beats, on top of 2 different evenly spaced notes, or beats? One way I've seen this done, is to write out groups of numbers in rows. For the 3:2 polyrhythm you can write out two rows of numbers that go 1 2 3.
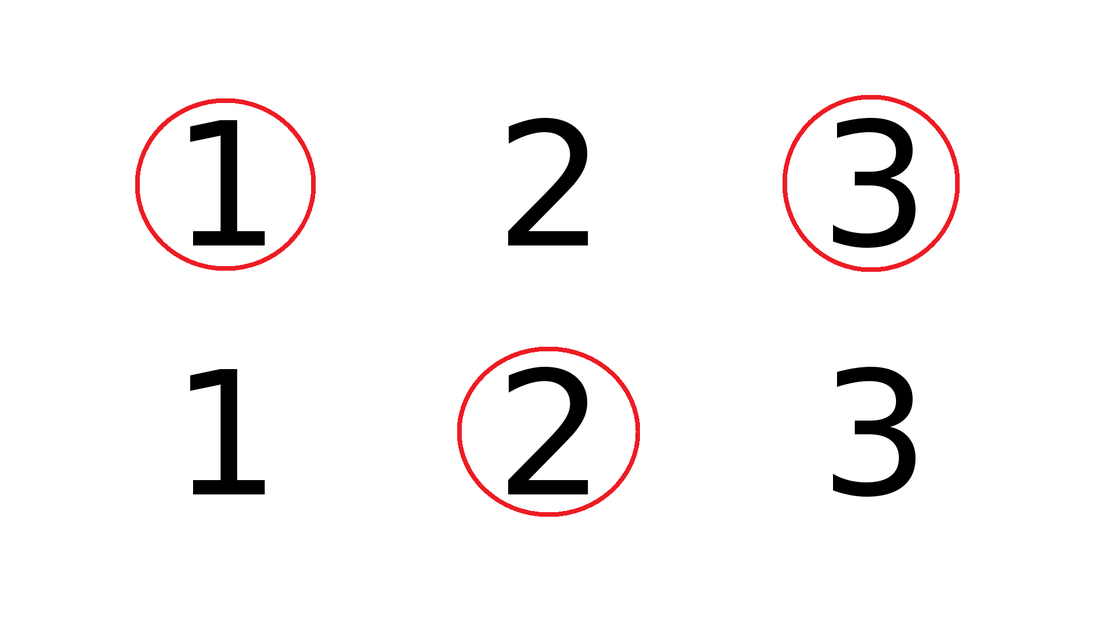
Then, you circle the first number for every group of two numbers.
Each row represents one full beat. There are two beats shown in this example. Each beat is divided into 3 even parts. The circled numbers represent the parts of the beat where you play 3 evenly spaced notes. The 1 in both beats represent where you play 2 evenly spaced notes.
How this sounds, and other examples in this lesson will be demonstrated in the video found at the end of this entry.
This same method can be applied to any polyrhythm. The 2nd number in the polyrhythm is how many rows of numbers you will write out. The 1st number in the polyrhythm is how many numbers you will write in each row. The 2nd number also tells you how many groups of numbers there need to be so you know which numbers to circle.
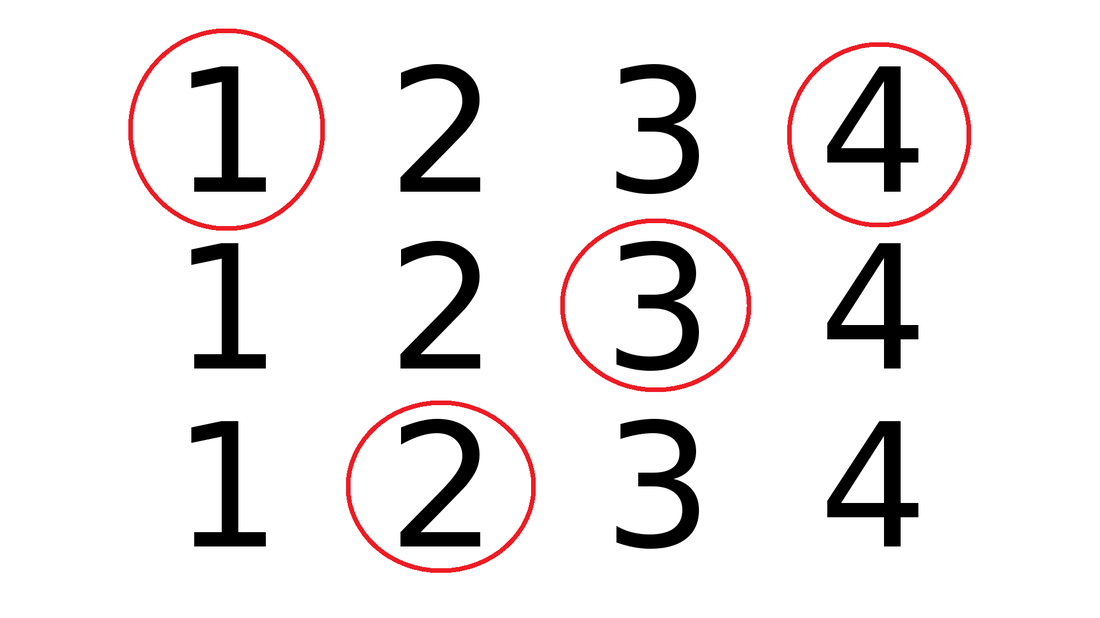
A 4:3 polyrhythm will get 3 rows, and each row will have 1 2 3 4. You will circle the first number for each grouping of 3 numbers.
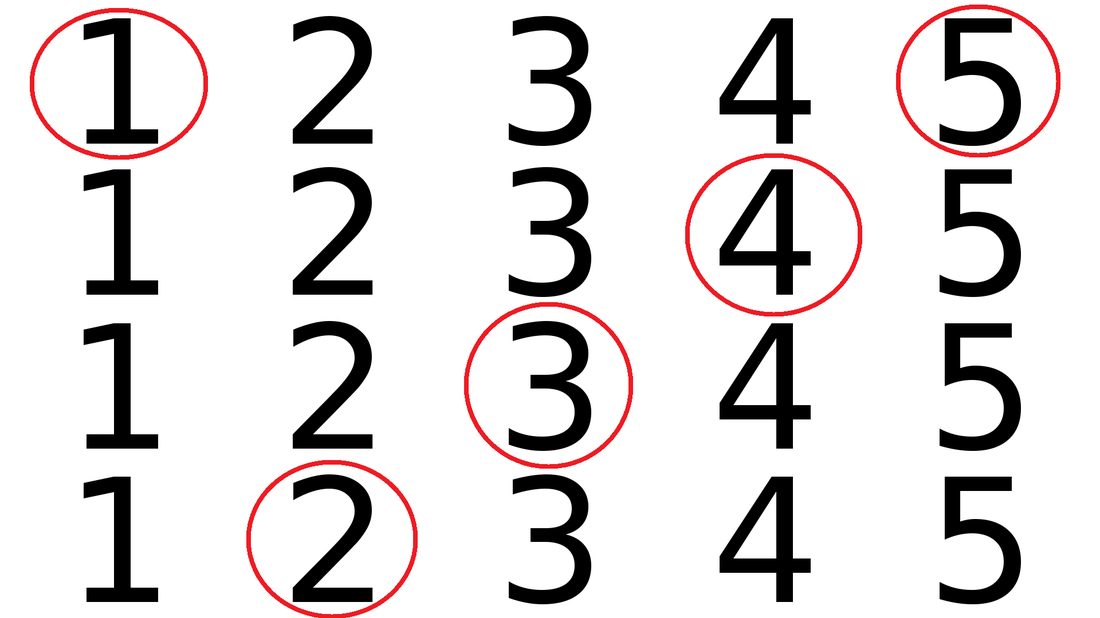
A 5:4 polyrhythm will get 4 rows, and each row will have 1 2 3 4 5. You will circle the first number for each grouping of 4 numbers.
Now, here's the problem I have with that method. Typically, you do not count out the parts of a measure, or beats with just numbers. For example, a piece of music playing straight 16th notes for four beats is typically counted out as 1ena2ena3ena4ena. Not 1234123412341234.
Counting out 1ena2ena3ena4ena helps you keep track of what beat you are on. Counting 1234123412341234 does not.
Let's talk about how I prefer to figure out and count polyrhythms. Let's take a look at the 3:2 polyrhythm again. The number 2, in the 3:2 polyrhythm, is our main number. We are working with 2 beats. The number 3, in the 3:2 polyrhythm, is our secondary number. The goal here is to space 3 notes over 2 notes. So, what has to happen in order to use a more typical method of counting music is the beat must be divided into 3 parts. And what happens when you divide a beat into 3 even parts? You get a triplet! Now we can view the beats like this:
1na2na
Just like before, the number 2 in our 3:2 polyrhythm tells us where in the beat we play the 3 evenly spaced notes. If you underline the first part of every two parts in the beats, you will know how to space the 3 notes over the 2 beats while using a more common method of counting rhythm.
1na2na
How about 4:3? 4:3 tells you we have 3 beats as our base. Each beat is divided into 4 parts. Counting 16th notes will get the job done here.
1ena2ena3ena
Now, underline the first part of every 3 parts in the beat.
1ena2ena3ena
What about the 5:4 polyrhythm? This one gets a little tricky. You need to divide each of the 4 beats into 5 equal parts. Dividing a beat into 5 parts is not a common thing to do. However, that does not mean it is impossible. My recommendation for counting out 5 equal parts per beat, with 4 beats total, is this:
1enae2enae3enae4enae
This allows us to keep track of what beat we are on, and I feel it's fairly simple to say.
Just like the previous two examples, portions of this rhythm, or parts of the beat, need to be underlined so we can see where in the beat we are going to play. Remember, the 2nd number in the polyrhythm ratio tells you how to group the parts of the beat. Because we are working with a 5:4 polyrhythm we will underline the first part of every 4 parts. It will look like this:
1enae2enae3enae4enae
Developing the ability to comfortably count these rhythms can take a while. Like anything else in music, taking small steps in learning something difficult can and will help you help you learn difficult things in the shortest amount of time possible.
Watch the following video on how to approach adding small pieces to learn a complex rhythm.
Would you like to be a part of getting more lessons like this made? CLICK HERE to see how you can help!
This lesson is the follow up to the Introduction To Polyrhythms lesson.
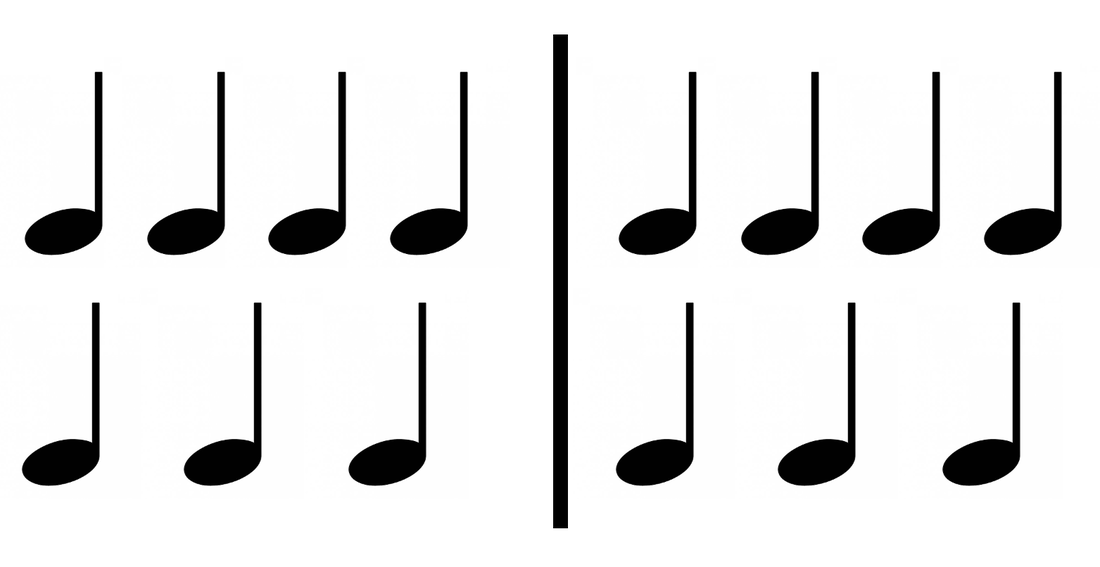
This lesson is going to go more in depth with polymeters before moving on to polyrhythms. To sum up the difference between a polyrhythm and a polymeter: A polyrhythm is smooshing at least two different rhythms into the same space. A polymeter uses at least two different time signatures that follow the same tempo which results in several repetitions of the piece of music before each section lines back up again. The polymeter HAS to cover multiple bars. The polyrhythm happens in the same bar. Let's take a look at some visual examples to help explain this better. A 4:3 polyrhythm, where you are playing 4 notes evenly spaced over 3 beats, can look something like this:
This represents two bars, or two measures.
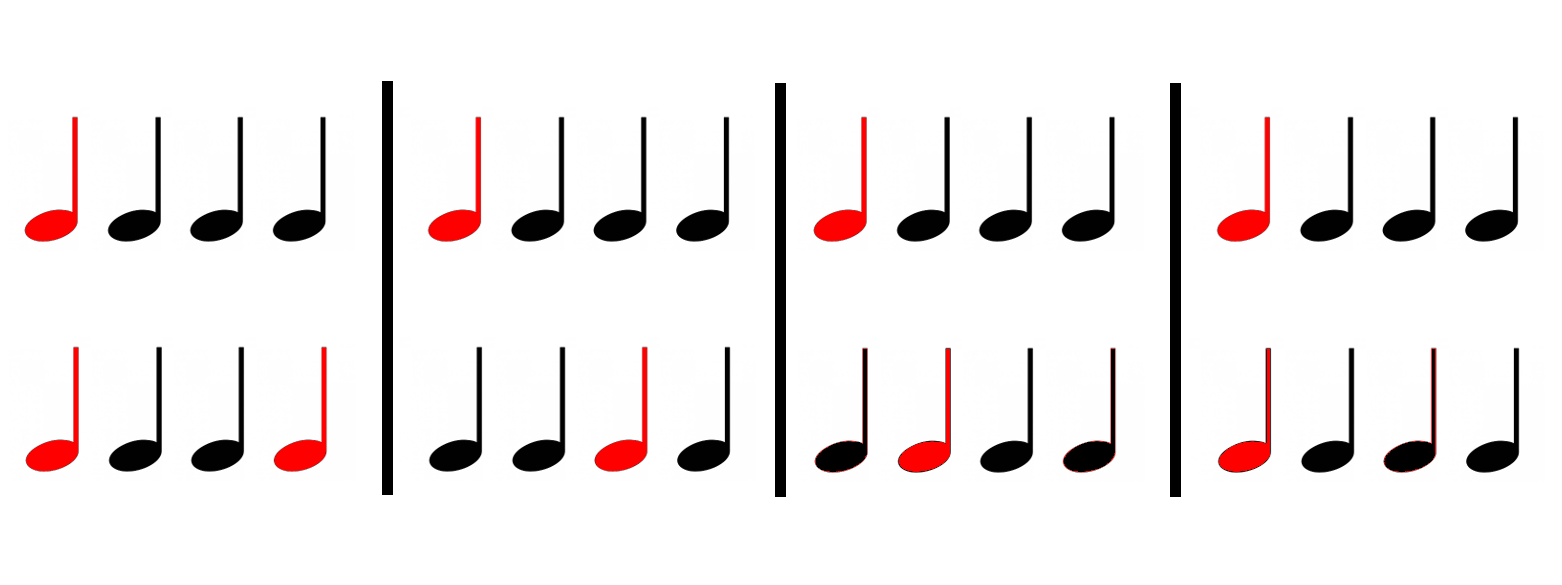
Notice how there are 4 notes on top, and 3 notes on the bottom? Both bars look the same. The polyrhythm takes place in just one bar. A polymeter that has a 4/4 time signature and 3/4 time signature looks something like this:
The red notes represent the starting point for each time signature.
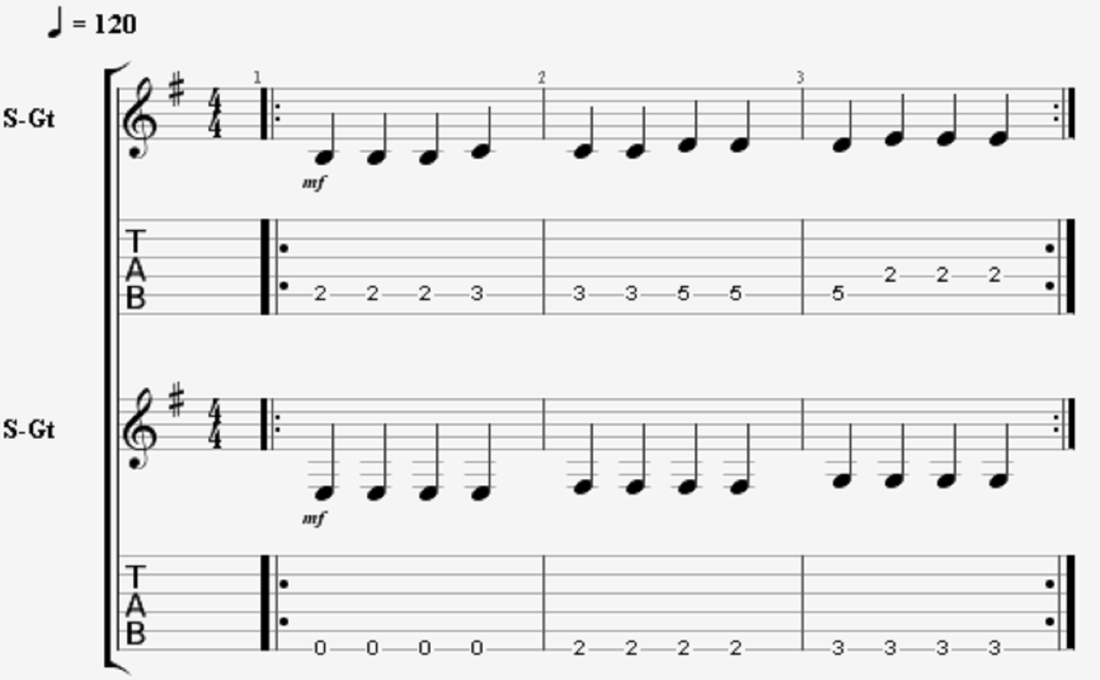
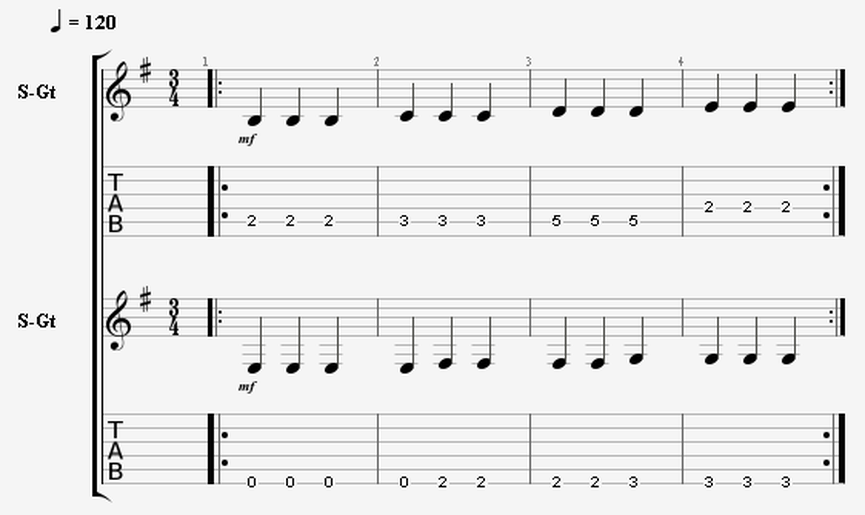
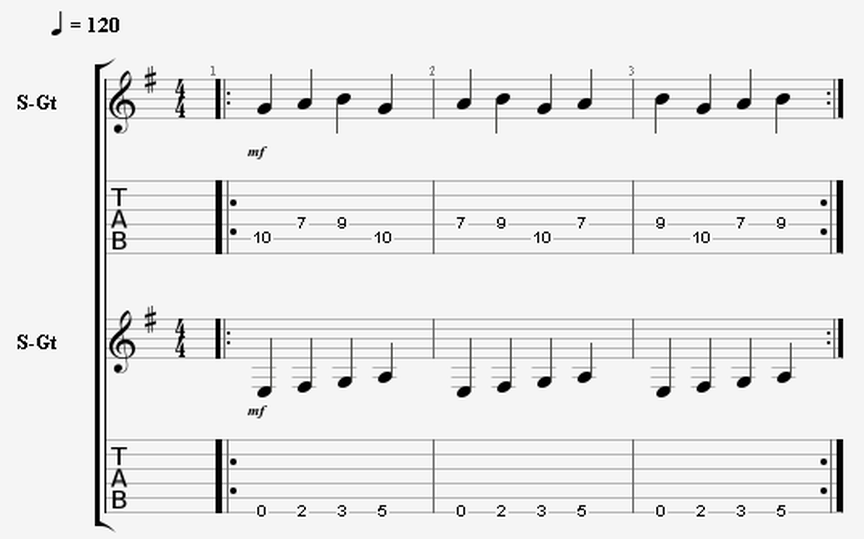
The top notes represent the 4/4 time signature. The bottom notes represent the 3/4 time signature. Notice how all of the notes line up with the same spacing? That's how a polymeter works. Two different time signatures with the exact same tempo, or beats per minute. It takes 3 full bars until the these two different time signatures line back up. Bar number 4 is where the pattern begins again. A 4:3 polyrhythm is not a 4/4 time signature being playing against, or over, a 3/4 time signature. Polyrhythms are within the same time signature. A 4:3 polyrhythm has you playing 4 beats in the same time span 3 beats are played. Polymeters use two different time signatures, and both have the same tempo. Now it's time for some polymeter examples! All of these examples are written for TWO SEPARATE guitars. ***There is a video at the end of this post that demonstrates all of the examples shown in this lesson*** This first example demonstrates a combination of a 4/4 time signature and a 3/4 time signature. The 4/4 time signature will divide up the bars/measures and be played in the 2nd stave.
Here is the same thing with the 3/4 time signature being used to divide up the bars/measures:
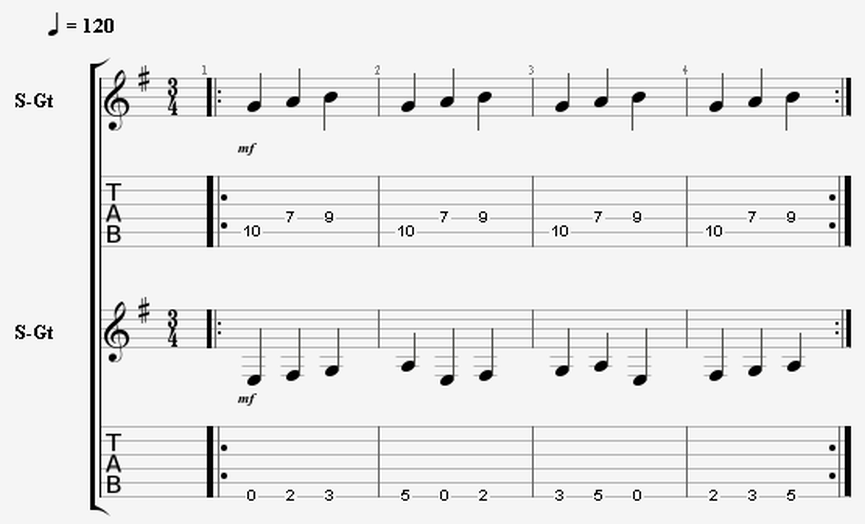
Now, let's do the same two time signatures but, this time, there will be a lot more movements in the notes.
The 4/4 time signature will divide up the bars/measures and be played in the 2nd stave.
Just like before, here's the same thing with the 3/4 time signature dividing up the bars/measures:
For the remaining examples, you will have one time signature being used to divide up the bars/measures, then the same piece of music will be shown again with the other time signature being used to divide up the bars/measures.
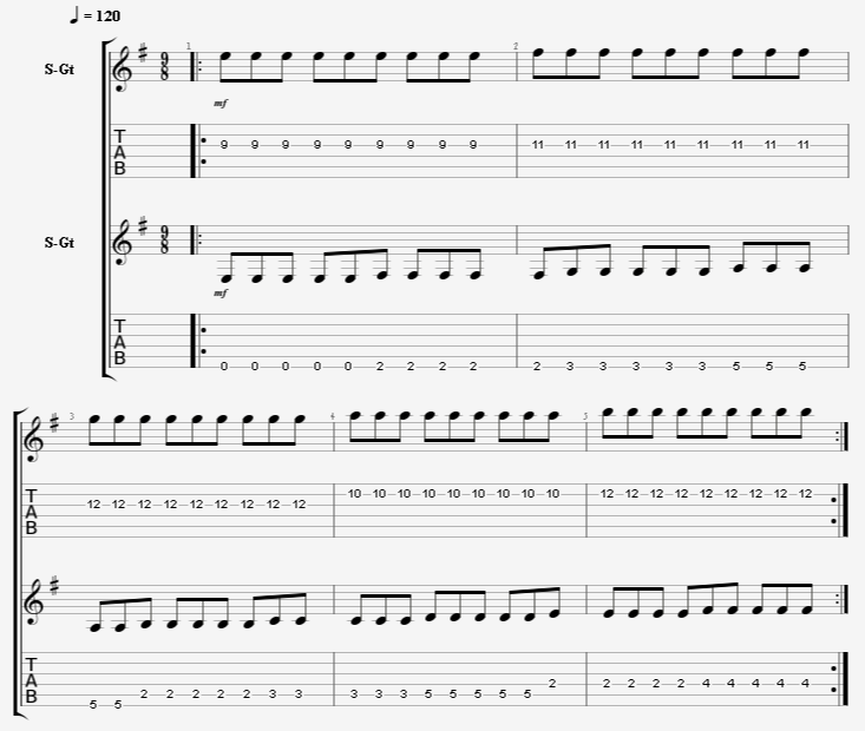
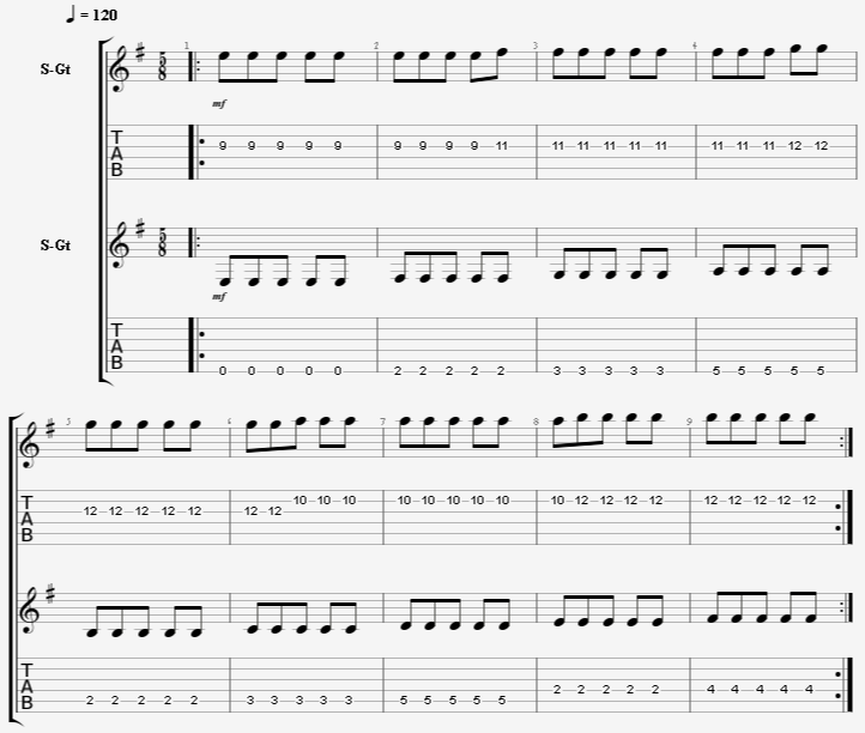
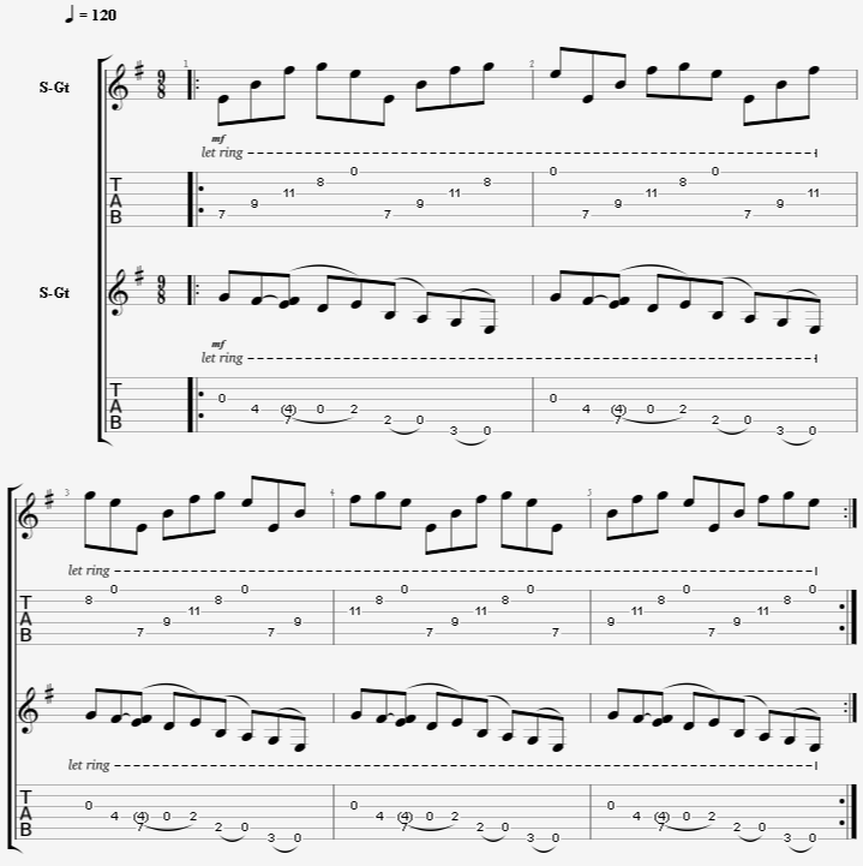
This next example will use a 9/8 time signature and a 5/8 time signature.
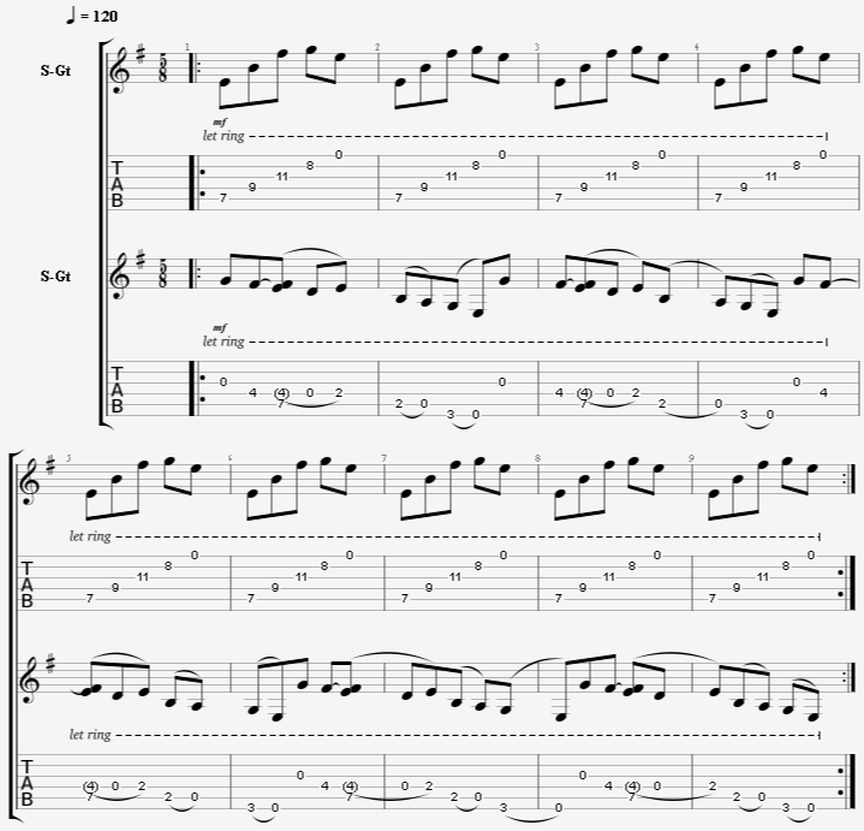
Let's take a look at another example using the same two time signatures, but with more complexity in the notes.
One more example in this lesson.
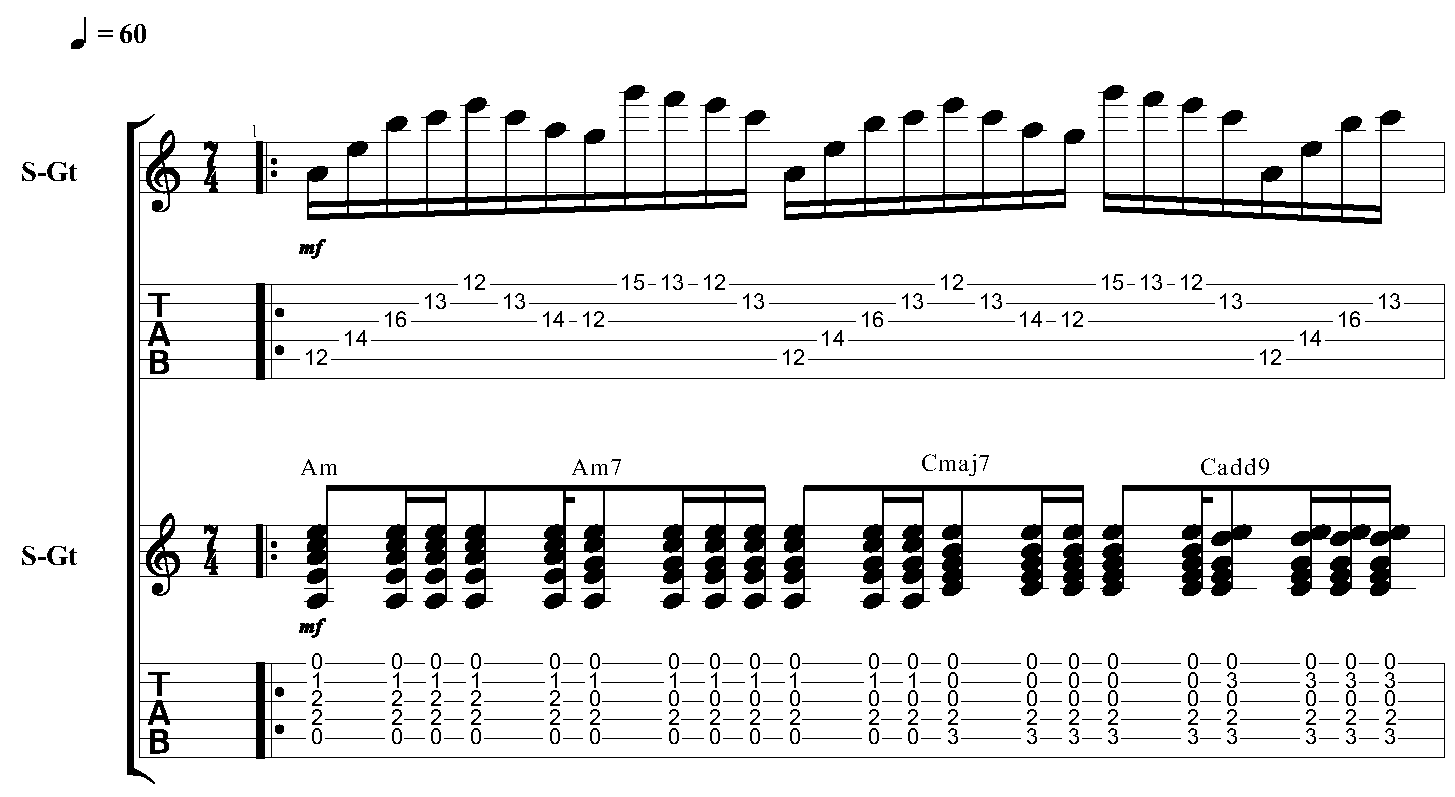
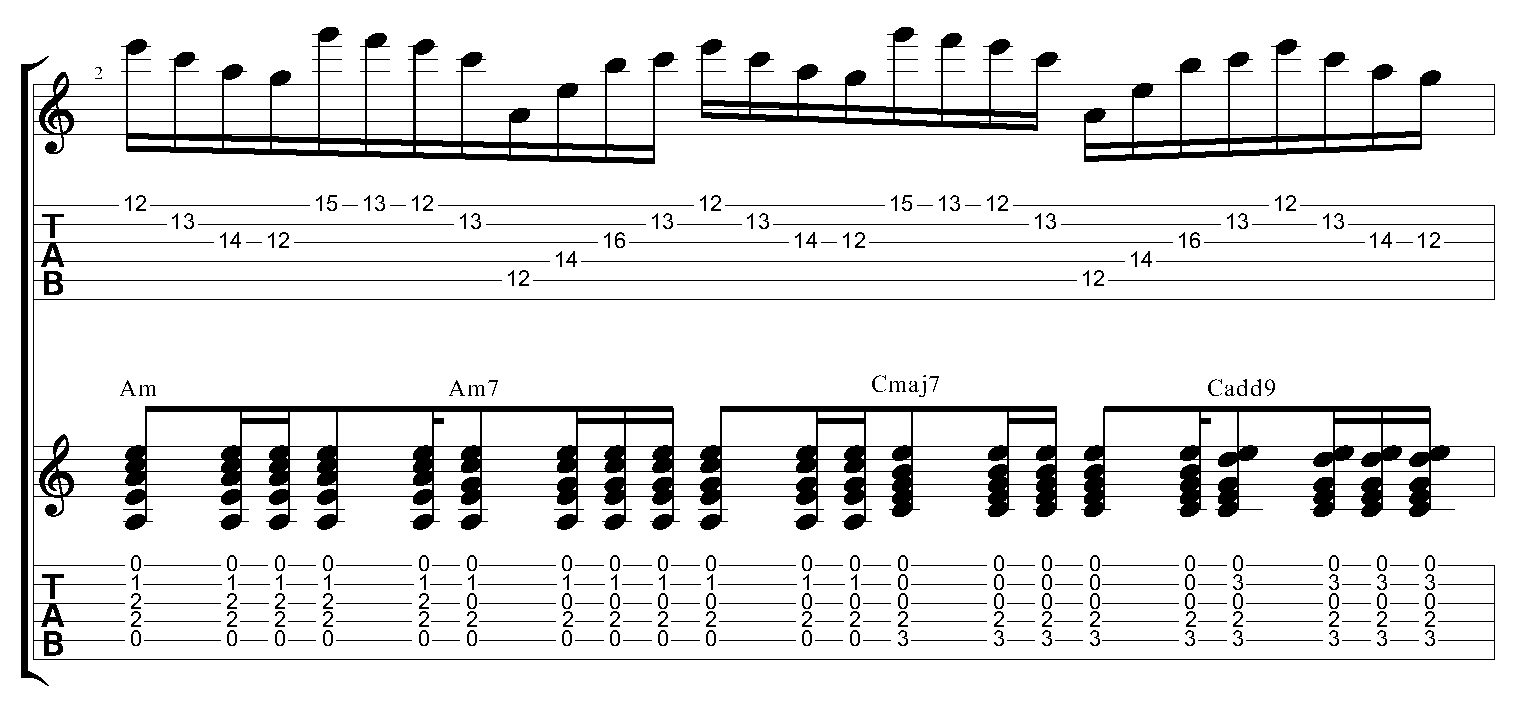
This one uses a 7/4 time signature and a 3/4 time signature. So far, everything has been using the same rhythm value for every note. In other words, the first and second examples used nothing but quarter notes for both time signatures. The third and fourth examples both used 8th notes the entire time. This final example will have all 16th notes for the 3/4 time signature, but the 7/4 time signature will have a more complex rhythm being used.
And that's it! No more examples for this lesson.
The next lesson in this series is going to explain to how figure out spacing polyrhythms correctly, how to count the polyrhythms, and start showing more in depth examples.
If you liked this lesson I would greatly appreciate you sharing it!
In addition to sharing these lessons, you can help get more of them made by joining the other Mile High Shred Patreon members by CLICKING HERE.
|
Available Instruction Courses
|
||||||||||||||||||||||||||||||||||||||||||||||||
- Metal and Rock Guitar Lessons
- Reach Your Fastest Speeds
-
Menu
- Skype Lessons
- Sign Up for Skype Guitar Lessons
- Video Correspondence Lessons
- Sign Up for Video Correspondence Lessons
- FREE Lessons for a WEEK >
- Free Tabs
- Get TWO FREE eBooks
- Rates
- Instruction Courses >
- Video Feedback Lessons
- Contact
- Blog (LOTS of Free Lessons)
- Student Testimonies
- Backing Tracks
- Store
IN DEPTH
|
|



 RSS Feed